菜单选项中带有图像和图标的自定义导航抽屉/侧边栏
这是使用 React Navigation 在菜单选项中自定义导航抽屉/侧边栏(带有图像和图标)的示例。我们将在本例中使用 react-navigation 制作导航抽屉。我希望您已经看过我们上一篇关于 React Native 导航抽屉的文章,因为这篇文章是 React Native 导航抽屉的扩展版本。
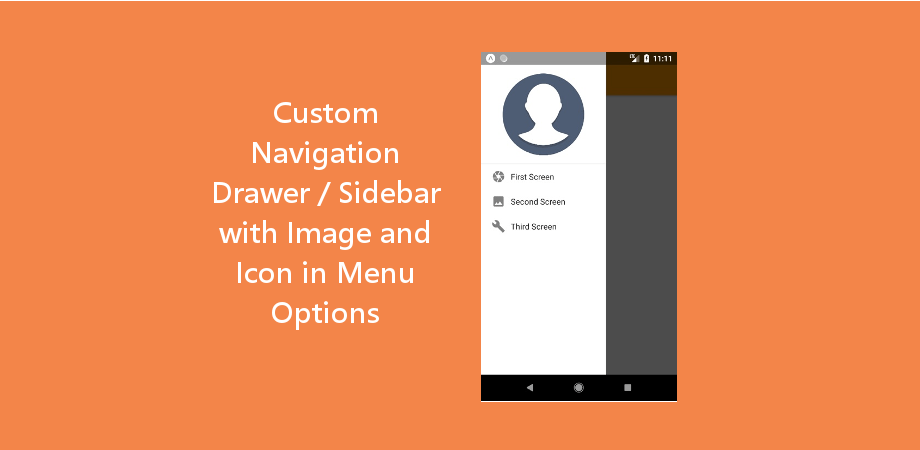
在此示例中,我们在导航菜单中有一个包含 3 个屏幕的导航抽屉。我们将制作自定义侧边栏来代替简单的导航抽屉,以便我们可以根据需要修改导航抽屉菜单选项。
在自定义侧边栏中,我们将有一个个人资料图片和带有图标的附加选项。我们将使用 drawerContent 支柱 Drawer.Navigator 设置我们的自定义视图,在此示例中为 CustomSidebarMenu.js。
推荐:React Native使用最新导航将屏幕从导航抽屉中切换出来
在导航抽屉/侧边栏菜单中设置自定义视图
}>
您也可以设置自己的自定义侧边栏。让我们从示例开始。
制作 React Native 应用
开始使用 React Native 将帮助您更多地了解如何创建 React Native 项目。我们将使用 react native 命令行界面来制作我们的 React Native 应用程序。
如果您之前安装了全局 react-native-cli 包,请将其删除,因为它可能会导致意外问题:
npm uninstall -g react-native-cli @react-native-community/cli运行以下命令创建一个新的 React Native 项目
npx react-native init ProjectName如果你想使用特定的 React Native 版本启动新项目,你可以使用 –version 参数:
npx react-native init ProjectName --version X.XX.X注意如果上述命令失败,你可能有旧版本的 react-native 或者 react-native-cli 已全局安装在您的电脑上。尝试卸载 cli 并使用 npx 运行 cli。
这将在您的项目目录中创建一个项目结构,其中有一个名为 App.js 的索引文件。
安装依赖项
对于 React Native 导航抽屉,我们需要添加 react-navigation 以及其他支持依赖项。
要安装依赖项,请打开终端并进入你的项目
cd ProjectName1. 安装 react-navigation
npm install @react-navigation/native --save2. 其他支持库 react-native-screens 和 react-native-safe-area-context
npm install react-native-screens react-native-safe-area-context --savereact-native-screens 软件包需要一个额外的配置步骤才能在 Android 设备上正常工作。编辑 MainActivity.java 文件位于 android/app/src/main/java//MainActivity.java。
将以下代码添加到 MainActivity 班级:
@Override
protected void onCreate(Bundle savedInstanceState) {
  super.onCreate(null);
}
并确保在此文件顶部的包语句下方添加以下导入语句:
import android.os.Bundle;需要进行此更改以避免与视图状态在 Activity 重启时不一致而导致的崩溃。
3. 安装抽屉导航器
npm install @react-navigation/drawer --save4.现在我们需要安装并配置安装react-native-gesture-handler 和 react-native-reanimated 抽屉导航器所需的库:
npm install react-native-gesture-handler react-native-reanimated --save配置 react-native-reanimated 将 Reanimated 的 Babel 插件添加到你的 babel.config.js (重新动画的插件必须列在最后。)
module.exports = {
  presets: (
    ...
  ),
  plugins: (
    ... ,
    'react-native-reanimated/plugin'
  ),
};
配置 react-native-gesture-handler,在入口文件的顶部添加以下内容(确保它在顶部,并且之前没有其他内容),例如 index.js 或者 App.js
import 'react-native-gesture-handler';注意:如果您正在为 Android 或 iOS 构建,请不要跳过此步骤,否则您的应用即使在开发过程中运行良好,也可能会在生产中崩溃。这不适用于其他平台。
5. 这些步骤对于抽屉导航来说已经足够了,但在这个例子中,我们还要在屏幕之间移动,所以我们还需要 Stack Navigator
npm install @react-navigation/native-stack --saveCocoaPods 安装
请使用以下命令安装 CocoaPods
npx pod-install项目结构
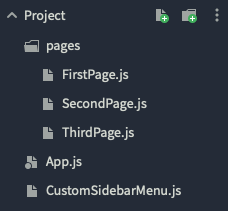
要开始此示例,您需要创建一个名为 页面 在你的项目中创建三个文件 Firstpage.js, SecondPage.js, ThirdPage.js 在里面。
对于自定义侧边栏,创建一个名为 自定义侧边栏菜单.js 在项目目录中(而不是在页面目录中)

代码
现在在任何代码编辑器中打开 App.js 并将代码替换为以下代码
App.js
// Custom Navigation Drawer / Sidebar with Image and Icon in Menu Options
// https://aboutreact.com/custom-navigation-drawer-sidebar-with-image-and-icon-in-menu-options/

import 'react-native-gesture-handler';

import * as React from 'react';

import {NavigationContainer} from '@react-navigation/native';
import {createNativeStackNavigator} from '@react-navigation/native-stack';
import {createDrawerNavigator} from '@react-navigation/drawer';

import FirstPage from './pages/FirstPage';
import SecondPage from './pages/SecondPage';
import ThirdPage from './pages/ThirdPage';

// Import Custom Sidebar
import CustomSidebarMenu from './CustomSidebarMenu';

const Stack = createNativeStackNavigator();
const Drawer = createDrawerNavigator();

function FirstScreenStack() {
  return (


  );
}

function SecondScreenStack() {
  return (


  );
}

function App() {
  return (

       }>


  );
}

export default App;
在任何代码编辑器中打开 pages/FirstPage.js 并用以下代码替换代码。
FirstPage.js
// Custom Navigation Drawer / Sidebar with Image and Icon in Menu Options
// https://aboutreact.com/custom-navigation-drawer-sidebar-with-image-and-icon-in-menu-options/
import * as React from 'react';
import {Button, View, Text, SafeAreaView} from 'react-native';
const FirstPage = ({navigation}) => {
return (
This is the First Page under First Page Option
Custom React Navigate Drawer
www.aboutreact.com
);
};
export default FirstPage;在任何代码编辑器中打开 pages/SecondPage.js 并用以下代码替换代码。
SecondPage.js
// Custom Navigation Drawer / Sidebar with Image and Icon in Menu Options
// https://aboutreact.com/custom-navigation-drawer-sidebar-with-image-and-icon-in-menu-options/
import * as React from 'react';
import {Button, View, Text, SafeAreaView} from 'react-native';
const SecondPage = ({navigation}) => {
return (
This is Second Page under Second Page Option
Custom React Navigate Drawer
www.aboutreact.com
);
};
export default SecondPage;在任何代码编辑器中打开 pages/ThirdPage.js 并用以下代码替换代码。
ThirdPage.js
// Custom Navigation Drawer / Sidebar with Image and Icon in Menu Options
// https://aboutreact.com/custom-navigation-drawer-sidebar-with-image-and-icon-in-menu-options/
import * as React from 'react';
import {Button, View, Text, SafeAreaView} from 'react-native';
const ThirdPage = ({navigation}) => {
return (
This is Third Page under Second Page Option
Custom React Navigate Drawer
www.aboutreact.com
);
};
export default ThirdPage;在任何代码编辑器中打开 CustomSidebarMenu.js 并用以下代码替换代码。
自定义侧边栏菜单.js
(带有大型个人资料图像和选项的自定义菜单)
// Custom Navigation Drawer / Sidebar with Image and Icon in Menu Options
// https://aboutreact.com/custom-navigation-drawer-sidebar-with-image-and-icon-in-menu-options/

import React from 'react';
import {
  SafeAreaView,
  View,
  StyleSheet,
  Image,
  Text,
  Linking,
} from 'react-native';

import {
  DrawerContentScrollView,
  DrawerItemList,
  DrawerItem,
} from '@react-navigation/drawer';

const CustomSidebarMenu = (props) => {
  const BASE_PATH =
    'https://raw.githubusercontent.com/AboutReact/sampleresource/master/';
  const proileImage="react_logo.png";

  return (

      {/*Top Large Image */}


         Linking.openURL('https://aboutreact.com/')}
        />

           {
              Linking.openURL('https://aboutreact.com/');
            }}>
            Rate Us


        www.aboutreact.com


  );
};

const styles = StyleSheet.create({
  sideMenuProfileIcon: {
    resizeMode: 'center',
    width: 100,
    height: 100,
    borderRadius: 100 / 2,
    alignSelf: 'center',
  },
  iconStyle: {
    width: 15,
    height: 15,
    marginHorizontal: 5,
  },
  customItem: {
    padding: 16,
    flexDirection: 'row',
    alignItems: 'center',
  },
});

export default CustomSidebarMenu;推荐:WordPress数据库搜索替换插件Better Search Replace Pro
运行 React Native 应用程序
再次打开终端并使用进入您的项目。
cd ProjectName1. 启动 Metro Bundler
首先,您需要启动 Metro,它是 React Native 附带的 JavaScript 打包器。要启动 Metro 打包器,请运行以下命令:
npx react-native start一旦启动 Metro Bundler,它将永远在您的终端上运行,直到您关闭它。让 Metro Bundler 在其自己的终端中运行。打开一个新终端并运行该应用程序。
2. 启动 React Native 应用程序
要在 Android 虚拟设备或真实调试设备上运行项目:
npx react-native run-android或者在 iOS 模拟器上运行(仅限 macOS)
npx react-native run-ios输出截图


在线模拟器中的输出
这就是如何使用 React Navigation 在菜单选项中创建带有图像和图标的自定义导航抽屉/侧边栏。如果您有任何疑问或想分享有关该主题的内容,您可以在下面发表评论或在此处联系我们。很快会有更多帖子发布。敬请期待!


