How to Take Visible Area and Scrolling Screenshots in Firefox
Capturing screenshots is one of the routine tasks you need to perform when taking notes and making references online. Both Windows (Snipping Tool) and Mac (Screenshot) offer system applications to simplify this task. While these applications are useful in other situations, it is convenient to use the built-in screen capture feature in your browser when surfing the Internet. In this article, we will introduce various ways to take screenshots in Mozilla Firefox browser.
Methods to Capture Screenshots in Firefox
When taking screenshots in Firefox, you can select a portion of the page, an element on the page, or capture the entire visible area. You can also scroll vertically to capture a full-page screenshot. So, follow one of the methods below based on your needs.
1. Take screenshots in Firefox using Developer Tools
Many users think that the Developer Tools section in the browser is only useful for developers to analyze web pages. However, you can also use the Developer Tools in Firefox to capture screenshots for different device models. Keep in mind that Chrome and Edge also offer screenshot options through the Developer Tools section. However, the steps are slightly different in Firefox as the backend is different from Chrome and Edge.
- Open your web page in Firefox and right-click on any area.
- Select the Inspect option from the context menu to open the Developer Tools section.
- Click on the Responsive Design Mode icon to open the responsive toolbar.
- Click on the Device List drop-down menu and select your device and change the orientation as needed.
- You will see a preview and the screenshot will be exactly as a model based on the viewport you selected.
- Firefox will immediately take a screenshot of the content area visible in the preview.
- You’ll see the image appear in your list of downloads.
- Click the image to open it or go to your Downloads folder and locate the screenshot.
If you see the screenshot image is cropped or truncated, make sure the preview is displaying correctly when you select the device/orientation from the responsive toolbar. To resize, click the Refresh button on the address bar to reload the page for the selected device before taking the screenshot.
2. Take a Region Screenshot in Firefox
The above method will capture all visible screen area and does not allow for partial selection. If you want to select a portion on the screen, follow this method:
- Open your web page and right-click on any area.
- Select the “Screenshot” option from the menu.
- Move the cursor on the page and Firefox will automatically highlight the page elements to capture.
- If you do not want to capture an element, drag the cursor with your mouse and select the area manually.
- Click the Download button to get the screenshot image or click the Copy button to copy the screenshot image to your clipboard.
3. Capture full-page scrolling screenshots in Firefox
You can also use auto-scrolling screenshots to capture full-length web pages that cover hidden content below the screen.
- Right-click on the web page and select the Screenshot option.
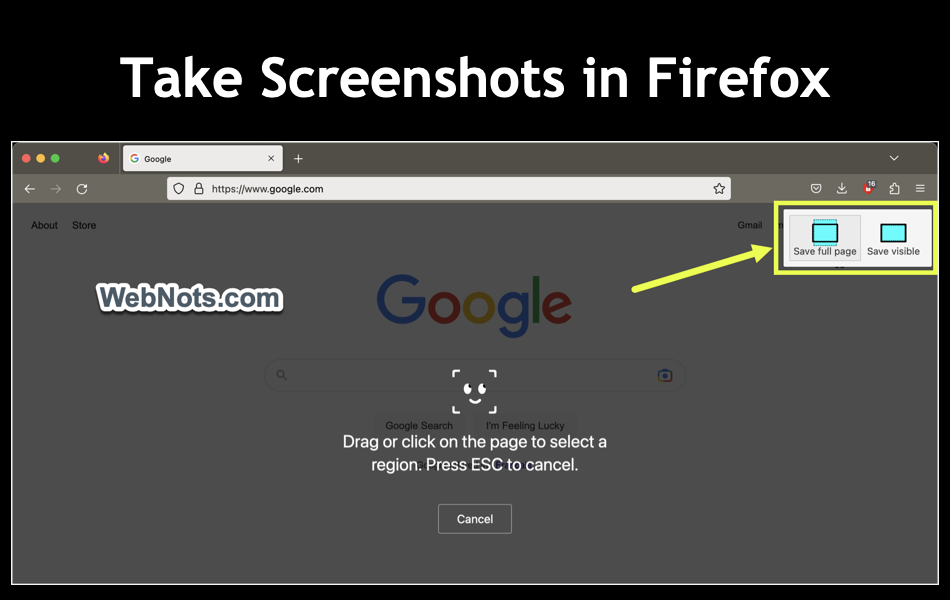
- Click the Save Full Page button that appears in the upper-right corner.
- Firefox will display a preview of the captured screenshot.
- Click the Download or Copy button to get the screenshot.
In addition to the full page option, you can also use the “Save Visible” button to capture only the visible area. This is like taking a screenshot from the Developer Tools section without adjusting the viewport.
4. Use FireShot add-on
If you don’t like the built-in functionality, there are hundreds of add-ons available to take screenshots in Firefox. FireShot is the most popular add-on that allows capturing a section, visible portion, or the entire page. The add-on also offers additional features for Windows users, such as annotation, upload, and email.
- Go to the official Mozilla Add-ons website.
- Type “screenshot” in the search box and press enter to filter the results.
- Select the “FireShot: Full Web Page Screenshots” add-on and click the “Add to Firefox” button.
- Check the permissions required by the add-on and click the Add button.
- If required, you will see a notification and check the “Allow this extension to run in a private window” option and click the “OK” button.
- Open the page you want to capture and click the extension icon in the address bar.
- Select the FireShot extension and choose to capture the entire page or visible portion or area as needed.
- You’ll see a neat preview and save the screenshot as an image or PDF or copy it to your clipboard.
- When saving as PDF, click the small arrow that appears in the Save as PDF button and select other options such as disable text
You can go to the extension’s options page to change the file format to PNG or JPG and the default save location in the download folder.
Summary
Firefox offers an integrated Pocket tool for saving your web pages offline and reading them later. However, this requires creating an account, which is not required for taking screenshots. Bookmarking is also not an option as it always requires an internet connection. Although extensions are good, you need to be careful about privacy as they can read all web page content, including the username and password you enter in the login page. Since it is possible to capture region, all visible area, and scrolling screenshots, it is sufficient to use the built-in Firefox screen capture feature safely in most cases. If needed, you can use other applications to annotate and write text on the captured image.
