
How to fix Photos file system error in Windows 10 and 11
Many Windows users use the Photos app to view and edit images in Windows 10 and 11. However, some users have reported a file system error with the Photos app on Microsoft’s support forums. These users say that a “File system error (-2147219196)” message pops up when they try to launch Photos.
This system error can be caused by Photos, but it can also appear when you launch other Windows apps. Unfortunately, you can’t fix this startup problem with Photos, so here are some fixes that can actually fix the file system error in Windows 10 and 11.
Recommendation: How to Fix Windows Roblox The Application Encountered an Unrecoverable Error
1. Check Windows Updates
Microsoft often releases patch updates to fix various Windows errors. Since this file system error has been widely reported, it may not have escaped the attention of the big M. Therefore, it is recommended that you check, download and install all other Windows updates as follows:
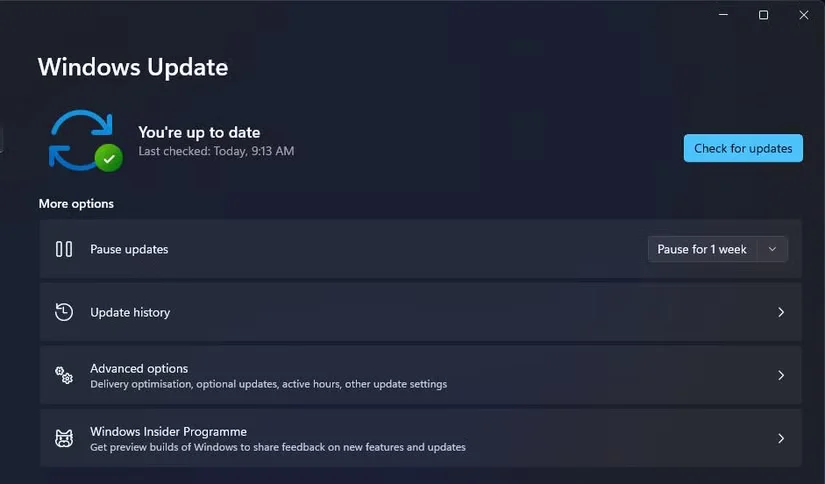
- Launch the Settings configuration application. You can use its win+i keyboard shortcut to quickly open it.
- Select Windows Update along the left side of Settings.
- Click the Check for updates option to initiate the search. Windows will automatically download and install any available patch updates it finds.
- If you see any optional updates listed under the Check for updates button, click Download and install their selections.
The steps to check for updates in Windows 10’s Settings app are slightly different. You’ll need to select the Update & Security category of settings in Windows 10. You can then select the same Check for updates option from there.
2. Run the Windows Store Apps troubleshooter
The Windows Store Apps troubleshooter can fix a variety of UWP (Universal Windows Platform) app problems. The troubleshooter doesn’t always work, but it’s always worth running it.
Here’s how to run the Windows Store Apps troubleshooter in Windows 10 or 11:
- Open Settings to view its System tab.
- Click Troubleshoot and then Other troubleshooters within the System tab.
- Then select the Run option to bring up the Windows Store Apps troubleshooter.
- Wait for the Windows Store Apps troubleshooter to detect the problem. It may automatically apply repairs or make recommendations for you to perform.
In Windows 10, you need to select Update & Security in Settings to reach the Troubleshoot tab. You can then select a More troubleshooters option from there. Select the Run the troubleshooter option for the Windows Store app.
3. Reset the Photos app
You can select both the Reset and Repair troubleshooting options for Photos in Windows 11 and 10. One option deletes the app’s data and the other applies repairs without affecting the data. Here’s how you can choose to reset and repair Photos in Windows 11:
- Open Settings via the Start menu or its hotkey.
- Select the Apps tab (or Category in Windows 10).
- Then click Apps & features to view the apps for your desktop or laptop.
- Select Advanced options Click the three-dot button of the Microsoft Photos app.
- Next, select the Repair option.
- If selecting Repair doesn’t fix the photo, try clicking Reset as well. Selecting Reset again allows the photo’s data to be cleared.
4. Restore the default pictures library
Sometimes, restoring the default pictures library can help fix this problem. To do this, follow these steps:
- Click the folder taskbar icon to open the Explorer file manager application.
- Double-click the Libraries folder in the Explorer navigation pane to expand it.
- Right-click the Picture Library to select Properties.
- Select the Restore Defaults option.
- Click Apply to save the default settings.
- Restart Windows after restoring the default libraries.
Recommended: 11 Best Shopify Cross-Selling Apps
5. Clean Boot Windows
To ensure that no third-party applications or services are interfering with photos in any way, try to clean boot Windows. Configuring a clean boot using the MSConfig utility will remove extraneous programs and services from Windows startup.
Here are the steps to clean boot Windows 10 and 11:
- Click Start with the right mouse button and select Run.
- Open the System Configuration tool by typing Configuration Files in Run and clicking OK.
- Uncheck the Load System Items checkbox on the General tab to deselect that setting.
- Click Services to open that tab’s options.
- To exclude more essential services, select Hide All Microsoft Services.
- Deselect all other services by clicking Disable All.
- Select Apply to save the new options.
- Then click OK to close the MSConfig tool.
- Click Restart in the System Configuration dialog box.
- Try launching Photos again after the restart to see if the file system error still occurs.
6. Reinstall the Photos app
You may need to reinstall the Photos app if none of the above solutions fix its file system error. It is also recommended to completely clean Photos leftovers after uninstalling the application.
Here is how to reinstall Photos in Windows and remove leftovers from it:
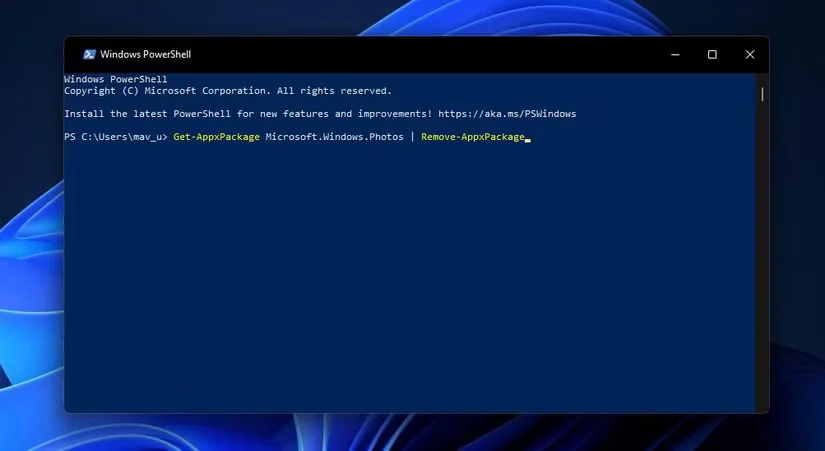
- First, press the Win + S key combination to bring up the search box.
- Type the keyword PowerShell in the text box of the search tool.
- Right-click the Windows PowerShell search result and select Run as Administrator.
- To uninstall Photos, enter the following PowerShell command:
Get-AppxPackage Microsoft.Windows.Photos | Remove-AppxPackage - Press the Return key to execute.
- Open the PsExec v2.3 webpage.
- Click the Download PsTools link there.
- Launch an Explorer window to navigate to the folder where you saved the PsTools ZIP.
- Right-click the PsTools ZIP to select Extract All.
- Click Browse in the extraction window that opens. Select to extract the ZIP to the C:\Program Files (x86)\PsTools folder location.
- Select Extract to extract the ZIP.
- Open a command prompt with elevated user rights.
- Enter the following text and click Return:
C:\ProgramFiles (x86)\PsTools\PsExec.exe-sidc:\windowsystem32\cmd.exe - Select the Agree option on the PsExec protocol window that opens.
- Next, enter this rd (delete directory) command in the new prompt window that opens and press Return:
rd /s “C:\Program Files\WindowsApps\Microsoft.Windows.Photos_2017.37071.16410.0_x64__8wekyb3d8bbwe” - Press the Yes keyboard key to give your approval.
- Open the Microsoft Store by clicking on the shortcut for the app on the Start menu.
- Type Microsoft Photos in the search box of the MS Store.
- Select to open the Microsoft Photos page. Click the Get button to reinstall the app.
Note that the version number in the title of the “Microsoft.Windows.Photos” folder on your PC may be different from the version number in the command specified in step 15. You need to take ownership of the “WindowsApps” folder to open the folder directory and check the version number of the “Microsoft.Windows.Photos” folder on your PC.
You can take ownership of the WindowsApps folder by entering the following PowerShell command:
TAKEOWN /F "C:\Program Files\WindowsApps" /R /D YKick-start Photos with These Potential Fixes
File system errors for photos are not always completely easy to fix. There are no guaranteed fixes for the error. However, those potential Windows 10 and 11 solutions for file system errors are certainly worth a try.
Remember that Photos isn’t the only image viewer app in the world. If the file system error persists after applying these resolutions, you can always check out some alternative image viewer apps for Photos. FastStone Image Viewer and IrfanView are two of the best freeware image viewers with a decent feature set.