带有分段菜单选项和页脚的React导航抽屉
这是使用 React Navigation 的带有分段选项菜单和页脚的导航抽屉/侧边栏菜单的示例。我们将在本例中使用 react-navigation 制作导航抽屉。我希望您已经看过我们关于 React Native 导航抽屉的上一篇文章,因为这篇文章是 React Native 导航抽屉的扩展版本。
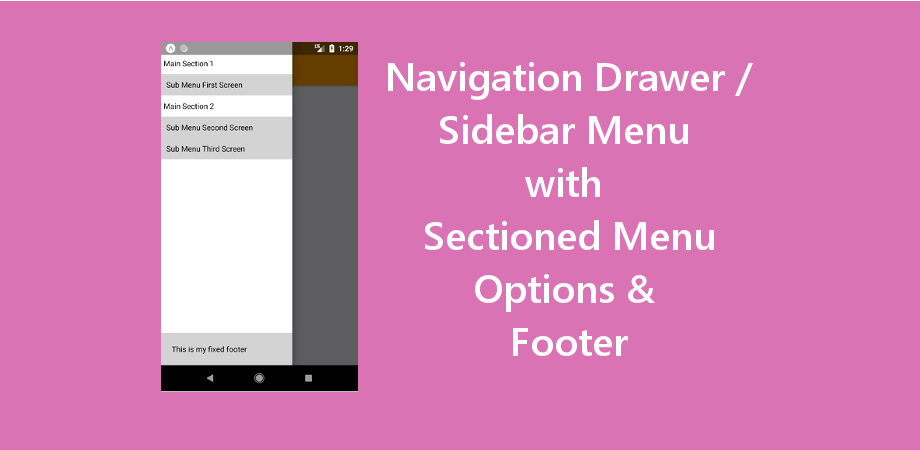
在此示例中,我们在导航菜单中有一个包含 3 个屏幕的导航抽屉。我们将制作一个自定义导航抽屉来代替默认导航抽屉,其中我们将有两个部分,一个部分包含 首页选项 第二部分 第二页选项 和 第三页选项。
推荐:在React Navigation Drawer中动态设置抽屉/侧边栏选项
在导航抽屉/侧边栏菜单中设置自定义视图
我们将使用 drawerContent 支柱 Drawer.Navigator 在导航抽屉中设置我们的自定义视图(此示例中为 CustomSidebarMenu)。
以下是导航容器/抽屉导航器的完整定义
您也可以通过这种方式设置自己的自定义侧边栏。
对于分区菜单
使用分区菜单创建自定义导航抽屉
- 我们将添加更多 群组名称 在选项中 抽屉.屏风 这将帮助我们识别导航选项的部分/组
- 默认情况下,抽屉是可滚动的,并支持带有凹口的设备,但如果是可爱的抽屉,我们必须使用 DrawerContentScrollView 自动处理
- 要在抽屉中的 DrawerContentScrollView 下添加项目,我们将使用 抽屉项目 成分
- 还会有一些自定义逻辑需要管理 抽屉项目 根据 群组名称 通过 抽屉.屏风 选项
如果您需要添加自己的部分/组和选项,您可以在 App.js 中添加/更新/删除 Drawer.Screen。请注意,groupName 是帮助您定义抽屉选项的部分/组的关键。
让我们开始编写代码,看看如何创建带有部分菜单的自定义导航栏
推荐:WordPress PageSpeed优化插件BerqWP
制作 React Native 应用
开始使用 React Native 将帮助您更多地了解如何创建 React Native 项目。我们将使用 react native 命令行界面来制作我们的 React Native 应用程序。
如果您之前安装了全局 react-native-cli 包,请将其删除,因为它可能会导致意外问题:
npm uninstall -g react-native-cli @react-native-community/cli运行以下命令创建一个新的 React Native 项目
npx react-native init ProjectName如果你想使用特定的 React Native 版本启动新项目,你可以使用 –version 参数:
npx react-native init ProjectName --version X.XX.X注意如果上述命令失败,你可能有旧版本的 react-native 或者 react-native-cli 已全局安装在您的电脑上。尝试卸载 cli 并使用 npx 运行 cli。
这将在您的项目目录中创建一个项目结构,其中有一个名为 App.js 的索引文件。
安装依赖项
对于 React Native 导航抽屉,我们需要添加 react-navigation 以及其他支持依赖项。
要安装依赖项,请打开终端并进入你的项目
cd ProjectName1. 安装 react-navigation
npm install @react-navigation/native --save2. 其他支持库 react-native-screens 和 react-native-safe-area-context
npm install react-native-screens react-native-safe-area-context --savereact-native-screens 软件包需要一个额外的配置步骤才能在 Android 设备上正常工作。编辑 MainActivity.java 文件位于 android/app/src/main/java//MainActivity.java。
将以下代码添加到 MainActivity 班级:
@Override
protected void onCreate(Bundle savedInstanceState) {
  super.onCreate(null);
}
并确保在此文件顶部的包语句下方添加以下导入语句:
import android.os.Bundle;需要进行此更改以避免与视图状态在 Activity 重启时不一致而导致的崩溃。
3. 安装抽屉导航器
npm install @react-navigation/drawer --save4.现在我们需要安装并配置安装react-native-gesture-handler 和 react-native-reanimated 抽屉导航器所需的库:
npm install react-native-gesture-handler react-native-reanimated --save配置 react-native-reanimated 将 Reanimated 的 Babel 插件添加到你的 babel.config.js (重新动画的插件必须列在最后。)
module.exports = {
  presets: (
    ...
  ),
  plugins: (
    ... ,
    'react-native-reanimated/plugin'
  ),
};
配置 react-native-gesture-handler,在入口文件的顶部添加以下内容(确保它在顶部,并且之前没有其他内容),例如 index.js 或者 App.js
import 'react-native-gesture-handler';注意:如果您正在为 Android 或 iOS 构建,请不要跳过此步骤,否则您的应用即使在开发过程中运行良好,也可能会在生产中崩溃。这不适用于其他平台。
5. 这些步骤对于抽屉导航来说已经足够了,但在这个例子中,我们还要在屏幕之间移动,所以我们还需要 Stack Navigator
npm install @react-navigation/native-stack --saveCocoaPods 安装
请使用以下命令安装 CocoaPods
npx pod-install项目结构
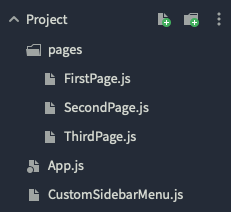
要开始此示例,您需要创建一个名为 页面 在你的项目中创建三个文件 Firstpage.js, SecondPage.js, ThirdPage.js 在里面。
对于自定义侧边栏,创建一个名为 自定义侧边栏菜单.js 在项目目录中(而不是在页面目录中)

代码
现在在任何代码编辑器中打开 App.js 并将代码替换为以下代码
App.js
// React Navigation Drawer with Sectioned Menu Options & Footer
// https://aboutreact.com/navigation-drawer-sidebar-menu-with-sectioned-menu-options-footer/

import 'react-native-gesture-handler';

import * as React from 'react';

import {NavigationContainer} from '@react-navigation/native';
import {createNativeStackNavigator} from '@react-navigation/native-stack';
import {createDrawerNavigator} from '@react-navigation/drawer';

import FirstPage from './pages/FirstPage';
import SecondPage from './pages/SecondPage';
import ThirdPage from './pages/ThirdPage';

// Import Custom Sidebar
import CustomSidebarMenu from './CustomSidebarMenu';

const Stack = createNativeStackNavigator();
const Drawer = createDrawerNavigator();

function FirstScreenStack() {
  return (


  );
}

function SecondScreenStack() {
  return (


  );
}

function ThirdScreenStack() {
  return (


  );
}

function App() {
  return (

       }>


  );
}

export default App;
在任何代码编辑器中打开 pages/FirstPage.js 并用以下代码替换代码。
FirstPage.js
// React Navigation Drawer with Sectioned Menu Options & Footer
// https://aboutreact.com/navigation-drawer-sidebar-menu-with-sectioned-menu-options-footer/

import * as React from 'react';
import {SafeAreaView, StyleSheet, View, Text} from 'react-native';

const FirstPage = () => {
  return (


            React Navigation Drawer with Sectioned Menu & Footer
            {'\n\n'}
            This is the First Page


          React Navigation Drawer with Sectioned Menu

        www.aboutreact.com


  );
};

const styles = StyleSheet.create({
  container: {
    flex: 1,
    alignItems: 'center',
    justifyContent: 'center',
  },
  textStyle: {
    fontSize: 18,
    textAlign: 'center',
  },
  footerHeading: {
    fontSize: 18,
    textAlign: 'center',
    color: 'grey',
  },
  footerText: {
    fontSize: 16,
    textAlign: 'center',
    color: 'grey',
  },
});

export default FirstPage;
在任何代码编辑器中打开 pages/SecondPage.js 并用以下代码替换代码。
SecondPage.js
// React Navigation Drawer with Sectioned Menu Options & Footer
// https://aboutreact.com/navigation-drawer-sidebar-menu-with-sectioned-menu-options-footer/

import * as React from 'react';
import {SafeAreaView, StyleSheet, View, Text} from 'react-native';

const SecondPage = () => {
  return (


            React Navigation Drawer with Sectioned Menu & Footer
            {'\n\n'}
            This is the Second Page


          React Navigation Drawer with Sectioned Menu

        www.aboutreact.com


  );
};

const styles = StyleSheet.create({
  container: {
    flex: 1,
    alignItems: 'center',
    justifyContent: 'center',
  },
  textStyle: {
    fontSize: 18,
    textAlign: 'center',
  },
  footerHeading: {
    fontSize: 18,
    textAlign: 'center',
    color: 'grey',
  },
  footerText: {
    fontSize: 16,
    textAlign: 'center',
    color: 'grey',
  },
});

export default SecondPage;
在任何代码编辑器中打开 pages/ThirdPage.js 并用以下代码替换代码。
ThirdPage.js
// React Navigation Drawer with Sectioned Menu Options & Footer
// https://aboutreact.com/navigation-drawer-sidebar-menu-with-sectioned-menu-options-footer/

import * as React from 'react';
import {SafeAreaView, StyleSheet, View, Text} from 'react-native';

const ThirdPage = () => {
  return (


            React Navigation Drawer with Sectioned Menu & Footer
            {'\n\n'}
            This is the Third Page


          React Navigation Drawer with Sectioned Menu

        www.aboutreact.com


  );
};

const styles = StyleSheet.create({
  container: {
    flex: 1,
    alignItems: 'center',
    justifyContent: 'center',
  },
  textStyle: {
    fontSize: 18,
    textAlign: 'center',
  },
  footerHeading: {
    fontSize: 18,
    textAlign: 'center',
    color: 'grey',
  },
  footerText: {
    fontSize: 16,
    textAlign: 'center',
    color: 'grey',
  },
});

export default ThirdPage;
在任何代码编辑器中打开 CustomSidebarMenu.js 并用以下代码替换代码。
CustomSidebarMenu.js (自定义菜单)
// React Navigation Drawer with Sectioned Menu Options & Footer
// https://aboutreact.com/navigation-drawer-sidebar-menu-with-sectioned-menu-options-footer/

import React from 'react';
import {SafeAreaView, View, StyleSheet, Text} from 'react-native';

import {DrawerContentScrollView, DrawerItem} from '@react-navigation/drawer';

const CustomSidebarMenu = (props) => {
  const {state, descriptors, navigation} = props;
  let lastGroupName="";
  let newGroup = true;

  return (


        {state.routes.map((route) => {
          const {
            drawerLabel,
            activeTintColor,
            groupName
          } = descriptors(route.key).options;
          if (lastGroupName !== groupName) {
            newGroup = true;
            lastGroupName = groupName;
          } else newGroup = false;
          return (

              {newGroup ? (


                    {groupName}


              ) : null}


                      {drawerLabel}

                }
                focused={
                  state.routes.findIndex(
                    (e) => e.name === route.name
                  ) === state.index
                }
                activeTintColor={activeTintColor}
                onPress={() => navigation.navigate(route.name)}
              />
            >
          );
        })}


        www.aboutreact.com


  );
};

const styles = StyleSheet.create({
  sectionContainer: {
    flex: 1,
    flexDirection: 'row',
    alignItems: 'center',
    marginTop: 10,
  },
  sectionLine: {
    backgroundColor: 'gray',
    flex: 1,
    height: 1,
    marginLeft: 10,
    marginRight: 20,
  },
});

export default CustomSidebarMenu;
运行 React Native 应用程序
再次打开终端并使用进入您的项目。
cd ProjectName1. 启动 Metro Bundler
首先,您需要启动 Metro,它是 React Native 附带的 JavaScript 打包器。要启动 Metro 打包器,请运行以下命令:
npx react-native start一旦启动 Metro Bundler,它将永远在您的终端上运行,直到您关闭它。让 Metro Bundler 在其自己的终端中运行。打开一个新终端并运行该应用程序。
2. 启动 React Native 应用程序
要在 Android 虚拟设备或真实调试设备上运行项目:
npx react-native run-android或者在 iOS 模拟器上运行(仅限 macOS)
npx react-native run-ios输出截图


在线模拟器中的输出
这就是使用 React Navigation 制作带有分段菜单和页脚的导航抽屉/侧边栏菜单的方法。如果您有任何疑问或想分享有关该主题的内容,您可以在下面发表评论或在此处联系我们。很快会有更多帖子发布。
