使用本地目录中的导航图标进行底部导航
以下是使用本地目录中的导航图标进行底部导航的示例。这篇文章是我之前关于如何使用最新导航制作 React Native 底部导航的文章的延伸。
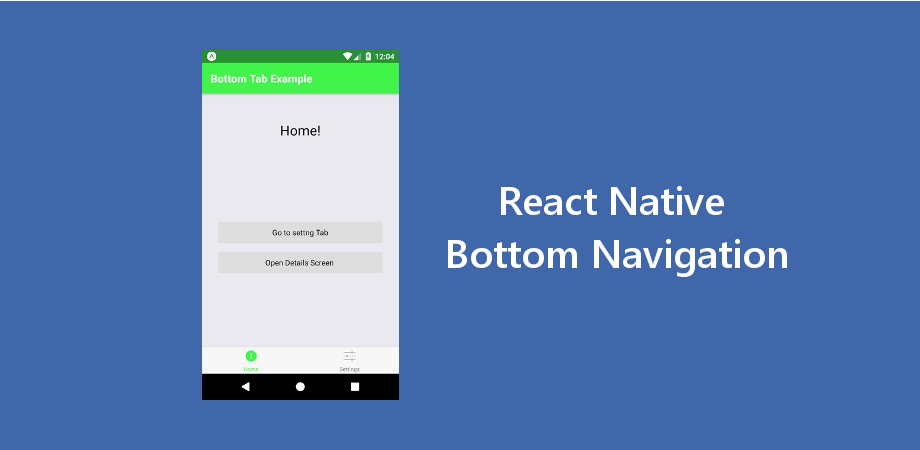
在此示例中,我们制作了与上一个示例相同的布局和流程,底部导航具有主页和设置等导航选项。每个屏幕也有其他导航选项,但这次导航选项卡图标将来自本地目录。
推荐:使用导航选项在RN中自定义React导航标题
制作 React Native 应用
开始使用 React Native 将帮助您更多地了解如何创建 React Native 项目。我们将使用 react native 命令行界面来制作我们的 React Native 应用程序。
如果您之前安装了全局 react-native-cli 包,请将其删除,因为它可能会导致意外问题:
npm uninstall -g react-native-cli @react-native-community/cli运行以下命令创建一个新的 React Native 项目
npx react-native init ProjectName如果你想使用特定的 React Native 版本启动新项目,你可以使用 –version 参数:
npx react-native init ProjectName --version X.XX.X注意如果上述命令失败,你可能有旧版本的 react-native 或者 react-native-cli 已全局安装在您的电脑上。尝试卸载 cli 并使用 npx 运行 cli。
这将在您的项目目录中创建一个项目结构,其中有一个名为 App.js 的索引文件。
安装依赖项
对于 React Native 底部导航,我们需要添加 react-navigation 以及其他支持依赖项。
要安装依赖项,请打开终端并进入你的项目
cd ProjectName1. 安装 react-navigation
npm install @react-navigation/native --save2. 其他支持库 react-native-screens 和 react-native-safe-area-context
npm install react-native-screens react-native-safe-area-context --savereact-native-screens 软件包需要一个额外的配置步骤才能在 Android 设备上正常工作。编辑 MainActivity.java 文件位于 android/app/src/main/java//MainActivity.java。
将以下代码添加到 MainActivity 班级:
@Override
protected void onCreate(Bundle savedInstanceState) {
  super.onCreate(null);
}
并确保在此文件顶部的包语句下方添加以下导入语句:
import android.os.Bundle;需要进行此更改以避免与视图状态在 Activity 重启时不一致而导致的崩溃。
3. 安装底部导航器
npm install @react-navigation/bottom-tabs --save4. 这些步骤对于底部导航来说已经足够了,但在这个例子中,我们还在屏幕之间移动/切换,因此我们还需要 Stack Navigator
npm install @react-navigation/native-stack --saveCocoaPods 安装
请使用以下命令安装 CocoaPods
npx pod-install项目文件结构
要开始此示例,您需要创建
- 在您的项目中创建一个名为 pages 的目录并在其中创建四个文件 DetailsScreen.js、HomeScreen.js、ProfileScreen.js 和 SettingScreen.js
- 名为 asset 的目录,用于存储我们的图标

代码
现在在任何代码编辑器中打开 App.js 并将代码替换为以下代码
App.js
// Bottom Navigation with Navigation Icon from Local Directory
// https://aboutreact.com/react-native-bottom-navigation-icon-from-local/

import React from 'react';
import {Image} from 'react-native';

import {NavigationContainer} from '@react-navigation/native';
import {createNativeStackNavigator} from '@react-navigation/native-stack';
import {createBottomTabNavigator} from '@react-navigation/bottom-tabs';

import HomeScreen from './pages/HomeScreen';
import DetailsScreen from './pages/DetailsScreen';
import ProfileScreen from './pages/ProfileScreen';
import SettingsScreen from './pages/SettingsScreen';

const Stack = createNativeStackNavigator();
const Tab = createBottomTabNavigator();

function HomeStack() {
  return (


  );
}

function SettingsStack() {
  return (


  );
}

function App() {
  return (

       ({
          headerStyle: {backgroundColor: '#42f44b'},
          headerTintColor: '#fff',
          headerTitleStyle: {fontWeight: 'bold'},
          tabBarActiveTintColor: 'tomato',
          tabBarInactiveTintColor: 'gray',
          tabBarIcon: ({focused, color, size}) => {
            return (

            );
          },
        })}>


  );
}
export default App;
在任何代码编辑器中打开 pages/DetailsScreen.js 并将代码替换为以下代码
DetailsScreen.js
// Bottom Navigation with Navigation Icon from Local Directory
// https://aboutreact.com/react-native-bottom-navigation-icon-from-local/

import * as React from 'react';
import {View, Text, SafeAreaView, StyleSheet} from 'react-native';

const DetailsScreen = () => {
  return (


            You are on Details Screen


          Bottom Navigation with Navigation Icon from Local Directory

        www.aboutreact.com


  );
};

export default DetailsScreen;

const styles = StyleSheet.create({
  container: {
    flex: 1,
    alignItems: 'center',
    justifyContent: 'center',
  },
  header: {
    fontSize: 25,
    textAlign: 'center',
    marginBottom: 16,
  },
  footerHeading: {
    fontSize: 18,
    textAlign: 'center',
    color: 'grey',
  },
  footerText: {
    fontSize: 16,
    textAlign: 'center',
    color: 'grey',
  },
});
在任何代码编辑器中打开 pages/HomeScreen.js 并将代码替换为以下代码
推荐:9个Android WhatsApp提示和技巧
HomeScreen.js
// Bottom Navigation with Navigation Icon from Local Directory
// https://aboutreact.com/react-native-bottom-navigation-icon-from-local/

import * as React from 'react';
import {
  TouchableOpacity,
  StyleSheet,
  View,
  Text,
  SafeAreaView,
} from 'react-native';

const HomeScreen = ({navigation}) => {
  return (


          You are on Home Screen

              navigation.navigate(
                'SettingsStack',
                {screen: 'Settings'}
              )
            }>
            Go to settng Tab

           navigation.navigate('Details')}>
            Open Details Screen


          Bottom Navigation with Navigation Icon from Local Directory

        www.aboutreact.com


  );
};

export default HomeScreen;

const styles = StyleSheet.create({
  container: {
    flex: 1,
    alignItems: 'center',
    justifyContent: 'center',
  },
  header: {
    fontSize: 25,
    textAlign: 'center',
    marginBottom: 16,
  },
  footerHeading: {
    fontSize: 18,
    textAlign: 'center',
    color: 'grey',
  },
  footerText: {
    fontSize: 16,
    textAlign: 'center',
    color: 'grey',
  },
  buttonStyle: {
    alignItems: 'center',
    backgroundColor: '#DDDDDD',
    padding: 10,
    width: 300,
    marginTop: 16,
  },
});
在任何代码编辑器中打开 pages/ProfileScreen.js 并将代码替换为以下代码
ProfileScreen.js
// Bottom Navigation with Navigation Icon from Local Directory
// https://aboutreact.com/react-native-bottom-navigation-icon-from-local/

import * as React from 'react';
import {View, Text, SafeAreaView, StyleSheet} from 'react-native';

const ProfileScreen = () => {
  return (


            You are on Profile Screen


          Bottom Navigation with Navigation Icon from Local Directory

        www.aboutreact.com


  );
};

export default ProfileScreen;

const styles = StyleSheet.create({
  container: {
    flex: 1,
    alignItems: 'center',
    justifyContent: 'center',
  },
  header: {
    fontSize: 25,
    textAlign: 'center',
    marginBottom: 16,
  },
  footerHeading: {
    fontSize: 18,
    textAlign: 'center',
    color: 'grey',
  },
  footerText: {
    fontSize: 16,
    textAlign: 'center',
    color: 'grey',
  },
});
在任何代码编辑器中打开 pages/SettingsScreen.js 并将代码替换为以下代码
SettingsScreen.js
// Bottom Navigation with Navigation Icon from Local Directory
// https://aboutreact.com/react-native-bottom-navigation-icon-from-local/

import * as React from 'react';
import {
  TouchableOpacity,
  StyleSheet,
  View,
  Text,
  SafeAreaView,
} from 'react-native';

const SettingsScreen = ({route, navigation}) => {
  return (


            You are on Setting Screen

           navigation.navigate('Home')}>
            Go to Home Tab

           navigation.navigate('Details')}>
            Open Detail Screen

           navigation.navigate('Profile')}>
            Open Profile Screen


          Bottom Navigation with Navigation Icon from Local Directory

        www.aboutreact.com


  );
};

export default SettingsScreen;

const styles = StyleSheet.create({
  container: {
    flex: 1,
    alignItems: 'center',
    justifyContent: 'center',
  },
  header: {
    fontSize: 25,
    textAlign: 'center',
    marginBottom: 16,
  },
  footerHeading: {
    fontSize: 18,
    textAlign: 'center',
    color: 'grey',
  },
  footerText: {
    fontSize: 16,
    textAlign: 'center',
    color: 'grey',
  },
  buttonStyle: {
    alignItems: 'center',
    backgroundColor: '#DDDDDD',
    padding: 10,
    width: 300,
    marginTop: 16,
  },
});
运行 React Native 应用程序
再次打开终端并使用进入您的项目。
cd ProjectName1. 启动 Metro Bundler
首先,您需要启动 Metro,它是 React Native 附带的 JavaScript 打包器。要启动 Metro 打包器,请运行以下命令:
npx react-native start一旦启动 Metro Bundler,它将永远在您的终端上运行,直到您关闭它。让 Metro Bundler 在其自己的终端中运行。打开一个新终端并运行该应用程序。
2. 启动 React Native 应用程序
要在 Android 虚拟设备或真实调试设备上运行项目:
npx react-native run-android或者在 iOS 模拟器上运行(仅限 macOS)
npx react-native run-ios这就是 React Native 底部导航。如果您有任何疑问或想分享有关该主题的内容,您可以在下面发表评论或在此处联系我们。很快会有更多帖子发布。